My interactive resume terminal
How I made an interactive CV that behaves similar to a terminal and is enhanced by AI
Developer from Germany who moved to the Bay area who is excited about functional programming, software architecture and much more.
The full code is available at https://github.com/alexknips/nextjs-cv.
The idea is funky and pretty useless but seamed fun to me: Build a resume website in a completely different way by making it look like a terminal but able to answer like a ChatBot.
After installing npm with the option of your choise (brew, manually, nvm, ...), you can create the basic NextJS site by
npx create-next-app@latest
I chose the following options
Would you like to use TypeScript? Yes
Would you like to use ESLint? Yes
Would you like to use Tailwind CSS? Yes
Would you like to use `src/` directory? Yes
Would you like to use App Router? (recommended) Yes
Let's install xtermjs and some additional plugins. (https://xtermjs.org/)[https://xtermjs.org/] is the project behind many modern JS based terminal implementations such as the terminal in VS Code.
npm install xterm xterm-addon-fit xterm-addon-web-links
The addon xterm-addon-fit will allow us to refit the xtermjs element to the parent selement and resize the number of columns and rows accordingly. xterm-addon-web-links will allow links in the terminal to be clickable and open in new tabs.
We will modify the page.tsx to reference XTermCompoment that we will create just after.
"use client";
import { useEffect, useState } from "react";
import dynamic from "next/dynamic";
const XTermComponent = dynamic(() => import("./XTermComponent"), {
  ssr: false,
});

export default function Home() {
  const [isXTermLoaded, setIsXTermLoaded] = useState(false);
  const [inProgress, setInProgress] = useState(false);

  const handleProgressChanged = (inProgress: boolean) => {
    setInProgress(inProgress);
  };
  useEffect(() => {
    setIsXTermLoaded(true);
  });

  return (
    <div className="flex flex-col h-screen">
      <header className="bg-customBlack flex flex-col items-center justify-center h-24">
        <h1 className="text-4xl font-bold font-mono text-gray-200">TITLE</h1>
        <p className="text-xl text-gray-600 font-mono mt-2">SUB-TITLE</p>
      </header>
      <div className="flex flex-grow justify-center items-center bg-customBlack">
        <div className="terminal-container w-4/6 bg-customBlack h-full p-4">
          {isXTermLoaded && (
            <div
              className={`h-full w-full transition-opacity duration-500 ${
                inProgress ? "opacity-50" : "opacity-100"
              }`}
            >
              <XTermComponent onProgressChanged={handleProgressChanged} />
            </div>
          )}
        </div>
      </div>
      <footer className="bg-customBlack text-center p-4 text-gray-600">
        <p>© YOUR NAME</p>
      </footer>
    </div>
  );
}
Here we have used Tailwind CSS styling.
We define handleProgressChanged as a function whenever the progress changes and we have a long running process going on. In that case we reduce the opacity of the XTermComponent to 50%.
Now to XTermComponent.tsx
import React, { useEffect, useRef } from "react";
import { Terminal } from "xterm";
import { FitAddon } from "xterm-addon-fit";
import { WebLinksAddon } from "xterm-addon-web-links";
import "xterm/css/xterm.css";

interface XTermComponentProps {
  onProgressChanged: (inProgress: boolean) => void;
}

const XTermComponent: React.FC<XTermComponentProps> = ({
  onProgressChanged,
}) => {
  const terminalRef = useRef<HTMLDivElement>(null);
  const terminal = new Terminal({
    cursorBlink: true,
    fontSize: 16,
    fontFamily: '"Fira Code", monospace'
  });

  useEffect(() => {
    let currentLine = "";
    function handleInput(data: string | Uint8Array) {
      // Check for Enter key
      if (data === "\r") {
        // Process the input when Enter is pressed
        processInput(currentLine).then(() => {
          terminal.write("$ ");
          currentLine = ""; // Reset the input buffer
        });
      } else if (data === "\x7f" || data === "\b") {
        // Handle backspace
        if (currentLine.length > 0) {
          // Remove the last character from the input buffer
          currentLine = currentLine.substring(0, currentLine.length - 1);
          // Move the cursor back one space, print a space (to clear the character), and move back again
          terminal.write("\b \b");
        }
      } else {
        currentLine += data; // Accumulate the input
        terminal.write(data); // Echo the input character
      }
    }

    async function processInput(input: string) {
      console.log("User entered:", input);
    }

    if (terminalRef.current) {
      const webLinksAddon = new WebLinksAddon();
      terminal.loadAddon(webLinksAddon);

      const fitAddon = new FitAddon();
      terminal.loadAddon(fitAddon);

      terminal.open(terminalRef.current);
      fitAddon.fit();

      // Let's resize the number of rows and columns max every 100ms when the window size changes
      let resizeTimeout: string | number | NodeJS.Timeout | undefined;
      window.addEventListener("resize", () => {
        clearTimeout(resizeTimeout);
        resizeTimeout = setTimeout(() => {
          console.log("Refitting");
          fitAddon.fit();
        }, 100); // Adjust the timeout duration as needed
      });
    }


    terminal.onData(handleInput);
    terminal.writeln("HELLO WORLD.")

    return () => {
      terminal.dispose();
    };
  }, []);

  return <div className="h-full w-full" ref={terminalRef} />;
};

export default XTermComponent;
Importantly, we have the components number of rows and columns resizing whenever the window changes.
So, not only we will use the fitAddon at startup but also whenever the window size changes
      terminal.open(terminalRef.current);
      fitAddon.fit();

      // Let's resize the number of rows and columns max every 100ms when the window size changes
      let resizeTimeout: string | number | NodeJS.Timeout | undefined;
      window.addEventListener("resize", () => {
        clearTimeout(resizeTimeout);
        resizeTimeout = setTimeout(() => {
          console.log("Refitting");
          fitAddon.fit();
        }, 100); // Adjust the timeout duration as needed
      });
Here, we have implented ENTER and BACKSPACE as special input
else if (data === "\x7f" || data === "\b") {
        // Handle backspace
        if (currentLine.length > 0) {
          // Remove the last character from the input buffer
          currentLine = currentLine.substring(0, currentLine.length - 1);
          // Move the cursor back one space, print a space (to clear the character), and move back again
          terminal.write("\b \b");
        }
      }
and only remove a character if the line buffer is not empty.
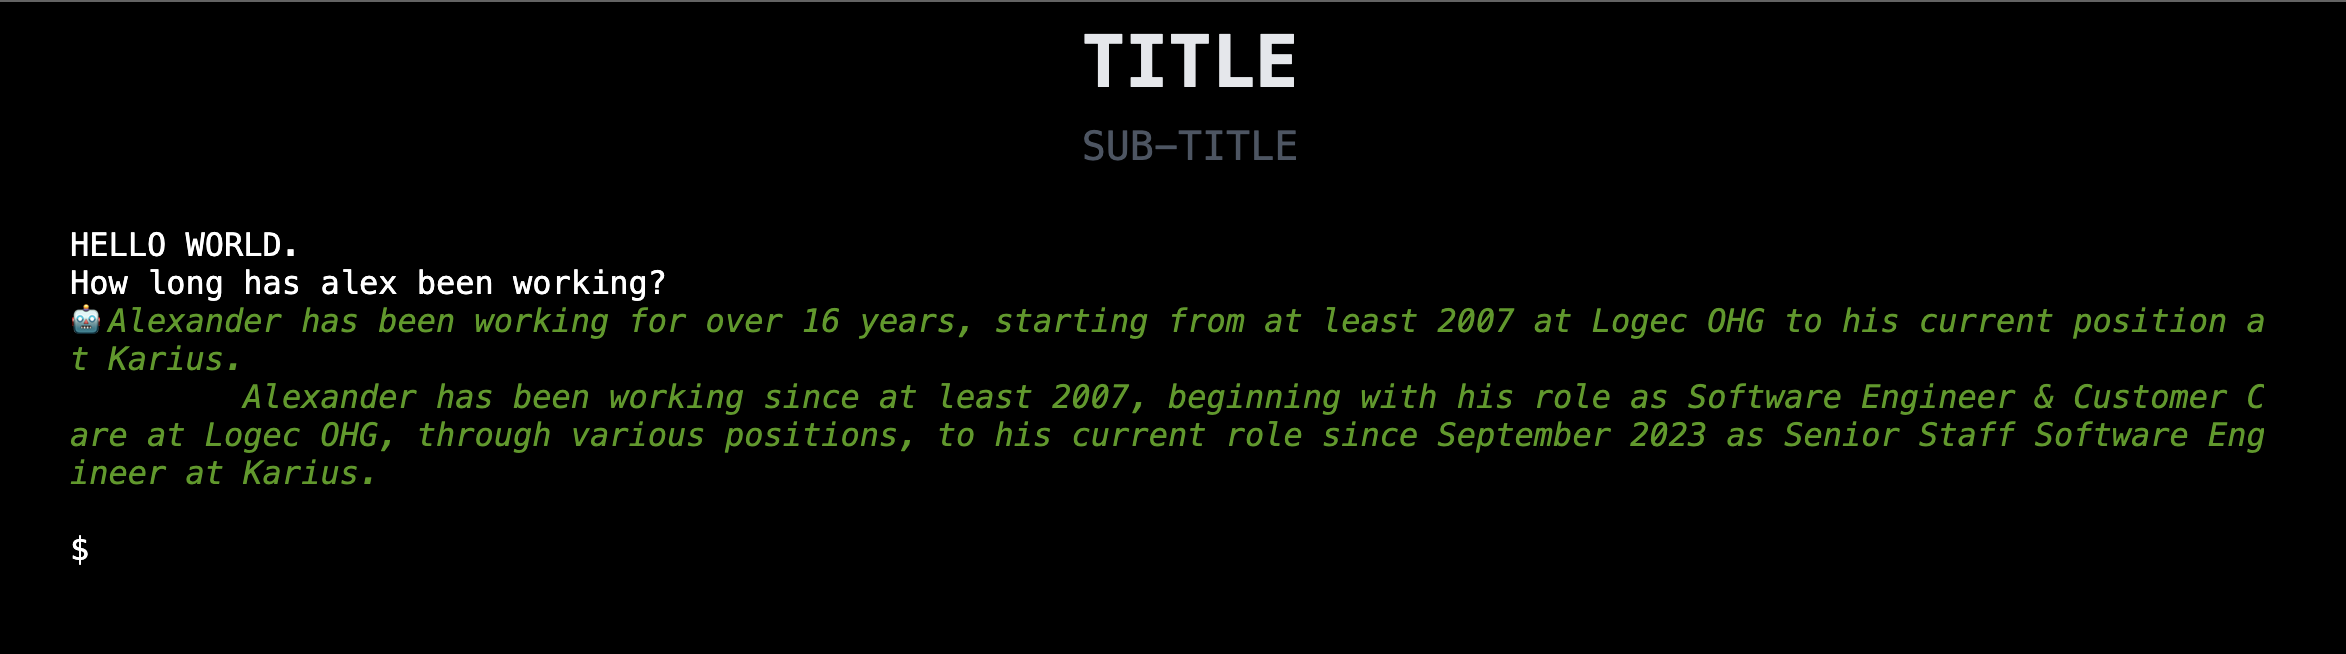
Now running the app using npm run build && npm run start (XtermJs does not play well with hot reloading for me at this point), we get:

Using terminal.write and terminal.writeln we can output more complex welcome messages. But let's get to the AI part and interact with the OpenAI API.
Before doing that, we need to configure our Assistant in OpenAI.
In https://platform.openai.com/assistants we create a new assistant
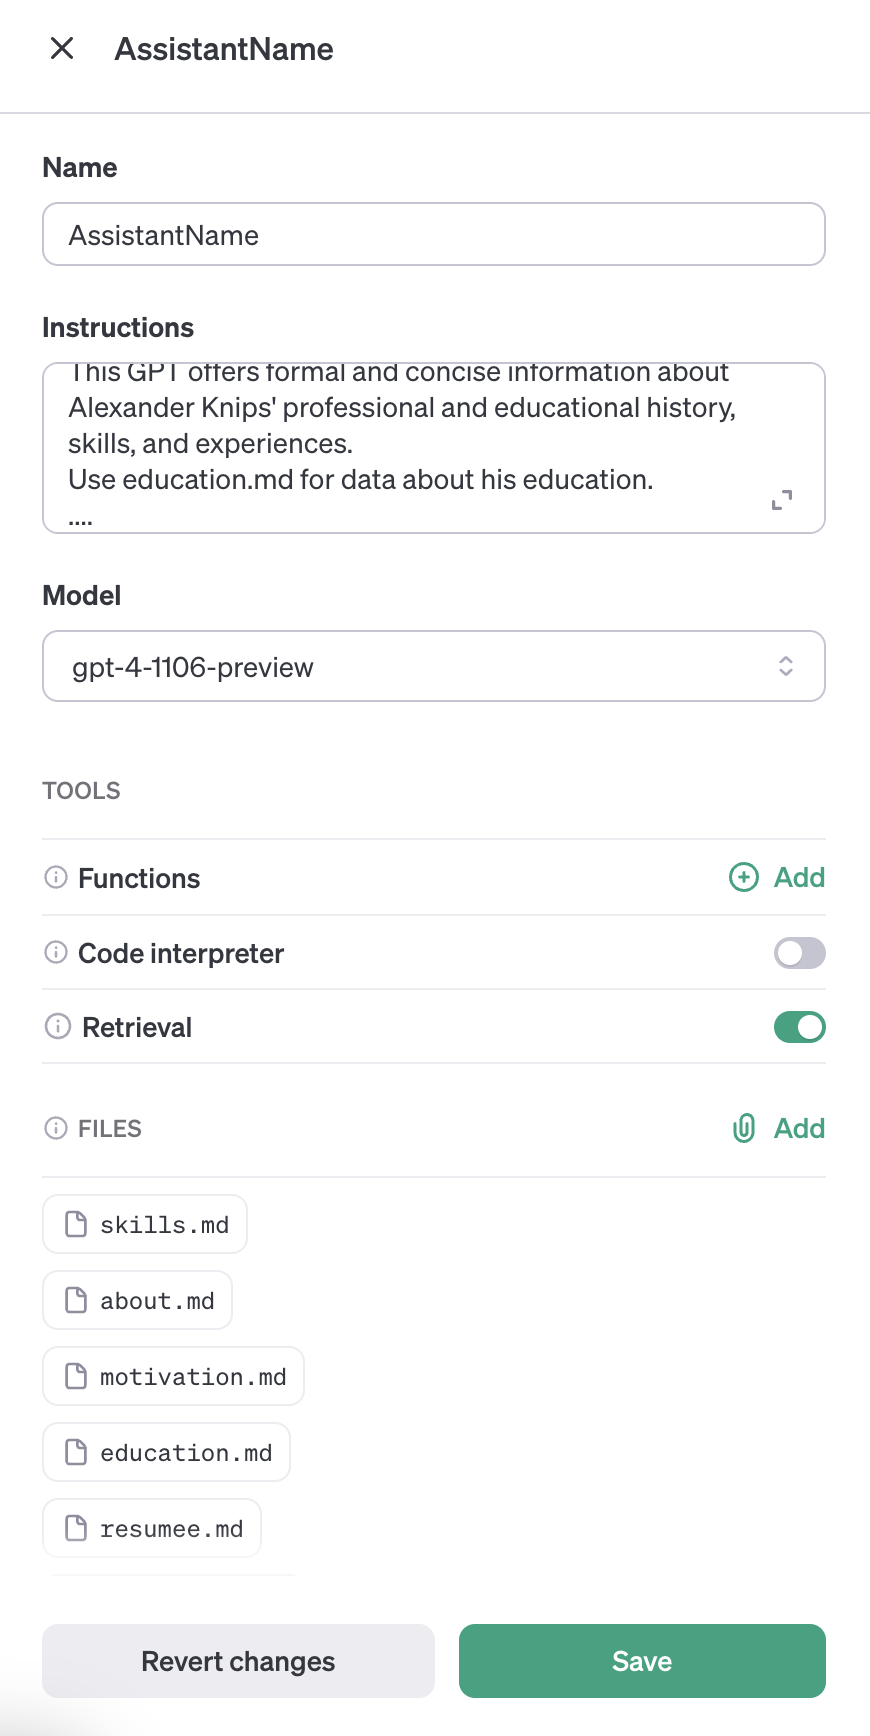
Here we enable Retrieval and add multiple files that contain the information about the resume.
In the instructions section we write something similar to
This GPT offers formal and concise information about Alexander Knips' professional and educational history, skills, and experiences.
Use education.md for data about his education.
Afterwards you can copy the assistant_id from the portal.
Now we define route.ts in the app/api/openai folder.
import { NextRequest, NextResponse } from "next/server";
import OpenAI from "openai";

export interface OpenAiRequestData {
  question: string;
}

interface Datastore {
  threadId: undefined | string;
}

function delay(ms: number) {
  return new Promise((resolve) => setTimeout(resolve, ms));
}

const assistantId = "asst_id";

let dataStore: Datastore = { threadId: undefined };

export const POST = async (req: NextRequest) => {
  try {
    const data: OpenAiRequestData = await req.json();
    const openai = new OpenAI();

    const threadId = await (async () => {
      if (dataStore.threadId === undefined) {
        console.log("Creating new thread");
        const thread = await openai.beta.threads.create();
        dataStore.threadId = thread.id;
        return thread.id;
      } else {
        console.log("Re-using old thread");
        return dataStore.threadId;
      }
    })();

    await openai.beta.threads.messages.create(threadId, {
      role: "user",
      content: data.question,
    });

    const run = await openai.beta.threads.runs.create(threadId, {
      assistant_id: assistantId,
    });
    await delay(3000);

    // Now, you might need to poll for messages
    // This is a simplified example; you'll need to add actual polling logic
    let completed = false;
    let failed = false;
    while (!completed && !failed) {
      let runResponse = await openai.beta.threads.runs.retrieve(
      threadId,
        run.id
      );
      console.log(runResponse.status);
      // messages = response.; // or however the messages are structured in the response
      completed = runResponse.status == "completed"; // Check if the run is completed
      failed =
        runResponse.status == "failed" ||
        runResponse.status == "cancelled" ||
        runResponse.status == "cancelling" ||
        runResponse.status == "expired" ||
        runResponse.status == "requires_action";
      // You might want to add a delay here to avoid hitting the API too frequently
      await delay(1000);
    }
    if (completed) {
      const messages = await openai.beta.threads.messages.list(threadId);
      const answers = messages.data.filter((x) => x.role == "assistant");
      console.log(JSON.stringify(messages));
      const answerString = answers
        .map((x) =>
          x.content
            .map((y) => (y.type == "text" ? y.text.value : ""))
            .join("\n")
        )
        .join("\n")
        .replace(/【.*?】/g, "");
      return NextResponse.json({ message: answerString }, { status: 200 });
    } else {
      return NextResponse.json(
        { message: "AI failed to answer" },
        { status: 400 }
      );
    }
  } catch (error) {
    // Handle errors and send an error response
    return NextResponse.json(
      { message: "Internal Server Error" },
      { status: 500 }
    );
  }
};
Here, we define assistantId as a constant. An assistant can also be created on the fly if you wish to do that. But for this use-case this really is not necessary.
Now, make sure that OPENAI_API_KEY is set in your environment and verify that through echo $OPENAI_API_KEY in your terminal. And install the openai npm package through
npm install openai
We will retry until the response status is completed or failed (or similar).
let completed = false;
let failed = false;
while (!completed && !failed) {
The code above really does not have proper error handling except for the most obvious case.
Let's enhance processInput function to
async function processInput(input: string) {
    console.log("User entered:", input);
    if (input.length > 3) await communicateWithAi(input);
    else terminal.writeln("\x1b[33m⚙️ \x1b[3mInput too short for AI to answer\x1b[23m\x1b[0m");
}
async function communicateWithAi(input: string) {
  const data = { question: input };
  // Make a request to your API route
  const resP = fetch("/api/openai", {
    method: "POST",
    body: JSON.stringify(data),
  });
  onProgressChanged(true);
  try {
    const res = await resP;
    onProgressChanged(false);
    const jsonRes = await res.json();
    console.log(JSON.stringify(jsonRes));
    const answer = jsonRes.message;

    terminal.writeln("\x1b[32m🤖 \x1b[3m" + answer + "\x1b[23m\x1b[0m");
    terminal.writeln("");
    console.log("Assistant responds:", answer);
  } catch {
    terminal.writeln(
      "\x1b[32m🤖 \x1b[3m Failed to answer this question. Try to ask differently.\x1b[23m\x1b[0m"
    );
  }
}
And we call the onProgressChanged function externally to notify the parent if the progress changes. You can use that hook to block user input or show a progess indicator.
Now we got a running AI in XtermJS
Full code available at https://github.com/alexknips/nextjs-cv. But please change the resume data to your own ;-).
Happy new year
![]()

